Solid wood is one of the most popular flooring choices. It brings depth, warmth, and a sense of connection to nature to interior décor, and it has been a favourite for generations. Whether you’re looking to enhance your living room or transform your hallway, solid wood flooring can elevate your interior décor. If this is your type, too, and you want to know more about how to install solid wood flooring, we prepared a full guide for you to learn everything from zero to a hundred.
Preparing for Installation
Before solid wood installation, ensure that both the space and the solid wood floorboards are properly prepared
Measuring and Ordering the Correct Amount
Measure the room size in square meters (length x width = m²) to determine how much flooring you need, then add 10-15% extra for cutting and wastage.
Ensure the room width is divided by the width of a panel, accounting for expansion gaps. If the last row is under 60mm, trim the first board along its length for a seamless finish.
read more: How to measure a room for flooring
Subfloor Preparation
After determining how much flooring is needed, start cleaning any debris or dust from the subfloor. Check any nails or screws and make sure they are not protruding and completely secured. and old adhesives must be removed.
Use a long, straight edge and spirit level to check the subfloor’s level, ensuring it doesn’t vary by more than 3mm over 1 metre. if you notice uneven spots, try to fix them by using a self-levelling compound or proper underlayment to ensure thay are smooth and solid wood can install properly.
Inspecting Your Solid Wood Floor

Upon receiving the flooring, it’s important to check a few pieces.
As natural wood can vary significantly between batches, it’s essential to inspect the grading, finish, and quality to ensure the product meets your expectations.
Acclimating the Wood
Now it’s time for the solid wood to get to know their new space! Therefore, you should leave unopened packs flat for at least 7 days. Stack them with spacers between the packs for airflow. Avoid leaning the packs against a wall or stacking them more than three high. Normal living conditions must be maintained; the room should have a humidity level between 45-65%. If the room is usually heated, keep the heating on as normal.
Expansion Gaps and Spacing
For solid wood flooring, it’s essential to leave an expansion gap around the perimeter of the room. Leave a 10-12mm expansion gap around the room’s perimeter, including walls, skirting boards, pipes, and doorframes. Limit the installation width to 5m and the length to 7m across the grain. In larger rooms, use expansion bars or spacers to manage wood expansion and maintain a professional finish.
Essential Tools for Installing Solid Wood Flooring
Here’s a list of essentials and suggestions to ensure the job runs smoothly:
Essential Items for solid wood installations
- hand Saw / electric Chop Saw
- pencil
- measuring tape
- wood-to-concrete adhesive (For Concrete Subfloors)
- flooring nailer (for nailing installation)
- moisture meter
- 2m Long Spirit Level
Recommended Tools:
- wood spacers
- pull bar
- Jigsaw
- combination square
- rubber mallet
- tapping block
- Chisel
- drill
- beading or skirting boards
- trowel
- Safety precautions, i.e., knee pads, safety goggles, dust masks, and ear defenders
How do I lay solid wood flooring on concrete?
The important tip to know how to install solid wood flooring on concrete correctly is to make sure it’s completely dry before installation. As concrete is porous, check moisture levels using a professional meter—acceptable moisture levels should be below 3% on a moisture meter or 12% on a prong test. Some meters use different scales, so always check the documentation. Installing a damp-proof membrane is essential to protect wooden boards from moisture.
How do I fit solid wood flooring on floorboards?
If the floorboards are clean, dry, and level, solid wood flooring can be laid directly on them. The best method for securing boards to timber subfloors is secret nailing at 90 degrees to the existing floorboards. If the floorboards are uneven, a 12mm plywood subfloor should be installed. Avoid laying solid wood flooring directly onto chipboard, as chipboard lacks strength and moisture resistance.
Different Installation Methods

Choosing your installation method (Nail-Down, Glue-Down, Floating)
depends on the type of your subfloor
Nail-Down: This is Suitable for timber subfloors, where planks are secured using nails through the tongue of each board.
Glue-Down: This is best for concrete subfloors, using adhesive to firmly bond planks. This method is ideal for tongue-and-groove parquet flooring.
Floating: In this method, planks are not attached to the subfloor but interlock via a tongue-and-groove system, allowing flexibility and easy replacement.
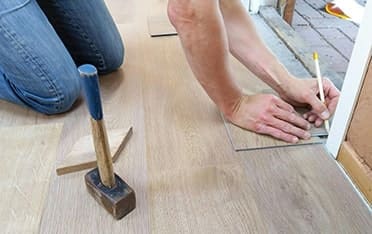
Step-by-Step Guide to Laying Solid Wood Flooring
Now it’s time to get started with laying solid wood flooring. Lay the planks parallel to the longest wall or the main light source for a seamless look. Measure and cut the planks carefully, ensuring clean edges. The final row may need trimming to fit properly.

Installing the Rows
Glue-Down Method: Start from one corner and spread adhesive along the subfloor. Position the first row with the tongue facing away from the wall, using 10-12mm spacers for an expansion gap. Ensure the row is perfectly straight, as this sets the direction for the entire floor. Apply adhesive 1 metre ahead of each row.
Nailing Method: Secure the first row with a nail gun. Then, use a powered flooring nailer or Tongue-Tite screws to fix each plank through the tongue, ensuring hidden nails. Continue staggering the joints for a natural look.
Floating Method: This method uses no nails or glue—just click planks together over underlay. Maintain a 10-12mm expansion gap and stagger joints.
For all methods, place spacers consistently to maintain a uniform expansion gap from the sidewalls.
Cutting and Fitting Around Obstacles
Use pre-cut boards for staggered joints. When fitting around pipes, position them at the centre of a plank for easier cutting.
Finishing touch
The final row may need to be trimmed for a proper fit. Secure it tightly with a pull bar and rubber mallet. If necessary, surface nail the last row. For floating floors, ensure the last plank clicks securely into place.
For the glue-down method, leave the floor for 24 hours before using the space. To maintain a straight line, always check the alignment of the planks
For solid wood flooring, a protective finish is important to preserve the wood. Common finishes include Polyurethane and Natural Oils.
How do I maintain solid wood flooring?
After learning how to install solid wood flooring correctly, proper maintenance is key to keeping it in excellent condition. To prevent scratches, attach felt pads or castors to the bottom of chairs and tables. To maintain the superb natural look of the wood, avoid using abrasive cloths or excessive water when cleaning. Instead, opt for dry brushes, vacuum cleaners, or specialist wood flooring maintenance products designed to protect the finish and extend the lifespan of your floor.
Common mistakes to avoid
If you’re not familiar with how to fit solid wood flooring, you may make some mistakes. Here are common mistakes you should be aware of.

Choosing the Wrong Type of Wood
Different types of wood have unique characteristics that impact durability and appearance. Ensure you select the right wood for your needs based on traffic levels and room conditions.
Choosing the Wrong Finish
Choosing an unsuitable finish can lead to rapid wear and tear. For high-traffic areas, a durable finish, such as polyurethane, is recommended to protect your flooring from everyday damage.
Not Preparing the Subfloor
It’s crucial to check the moisture levels in your subfloor before installation to avoid future issues like shifting floorboards or cracks.
Incorrect acclimation
Acclimating the wood helps prevent issues such as expansion or shrinkage, which could cause structural damage or warping of the floorboards.
Insufficient Expansion Gaps and Improper Spacing
For correct installation, you must leave expansion gaps to allow for wood movement over time. Without proper spacing, your floor could buckle or loosen. Ensure a ¾ inch gap along walls for hardwood and ½ inch for engineered wood. Additionally, the distance between nails or staples should be 10 to 12 inches, with at least two nails per floorboard, to prevent uneven movement.
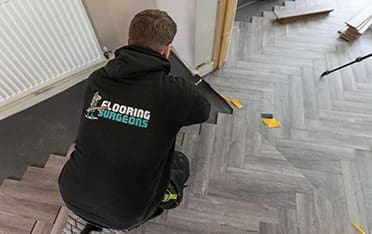
Hire a Professional Flooring Contractor Today
The easiest way to avoid costly hardwood flooring mistakes is by hiring a professional flooring contractor. Skilled professionals use the right techniques to ensure your installation meets industry standards. Leave the installation of your flooring to the expert fitting and enjoy a flawless, long-lasting result!
If you have any flooring queries, email us at info@flooringsurgeons.co.uk or visit our showrooms in Birmingham and Wolverhampton!
Halesowen
214A Dudley Road. Halesowen, Birmingham, B63 3NJ
0121 274 8575
Monday – Friday: 9 AM – 6 PM | Weekends: 10 AM – 4 PM
Wolverhampton
317 Penn Rd, Wolverhampton, West Midlands, WV4 5QF
01902 836 666
Monday – Friday: 9 AM – 6 PM | Sat: 10 AM – 4 PM | Sun: Closed
info@flooringsurgeons.co.uk